Creating To-Dos
Discover effective strategies and techniques for creating efficient and organized To-Do lists, helping you prioritize tasks and effectively manage your time and workload.

Written by Tommy Mains
Updated at May 11th, 2026
-
 Account Options and Troubleshooting
-
 Integrations
-
 Getting Started
-
 Insights
-
 Scorecard
-
 Rocks
Rocks
-
 To-Dos
-
 Issues
-
 Meetings
-
 Headlines
-
 V/TO
V/TO
-
 Accountability Chart
-
 1-on-1
-
 People and Toolbox
-
 Directory
-
 Knowledge Portal
-
 Assessments
-
 Mobile
-
 Maz
Maz
Table of Contents
Creating To-Dos in Ninety allows you to keep track of tasks or items that need to be completed by you or your team need to complete. To-Dos appear on both your My 90 workspace and the To-Dos page.
There are two main types of To-Dos: Team and Private. Each type of To-Do allows you to make it a repeating To-Do, saving you time by automatically creating the To-Do at your chosen cadence.

Team To-Dos
A team To-Do is the default To-Do within Ninety. It lets your team see your task items, their due dates, comments, and completion status. This type of To-Do is best for items that will be discussed and reviewed in team meetings.
You can view each of your team's To-Dos lists on their team page in the To-Dos tool. To view all your To-Dos from all of your teams in Ninety, use the Team To-Dos window available on your My 90 page (as shown in the image to the right).

Private To-Dos
A private To-Do can be seen as more of a reminder of the daily work you need to do. For example, if you need to follow up with a teammate about a document review, you could create a Private To-Do to make sure it's completed.
You view your private To-Dos by clicking the Private tab on the To-Dos tool page or on the Private To-Dos window available on your My 90 page (as shown in the image to the right).
Who Can See My Private To-Dos?
Private To-Dos are only visible to the person they are assigned to. Any licensed user can create a private To-Do for themselves or another user. Even Owners and Admins cannot view private To-Dos that are not assigned to them.
How to Create a To-Do

Add an action item to a user's To-Dos list using:
- The Create button
- The To-Dos widget from the My 90 workspace
- The To-Dos tool
- Linked items by creating a To-Do from an existing item
Creating To-Dos Using the Global Create Button

No matter what tool you're using in Ninety, the Create button is in the upper right-hand corner, making it easy to create new items.
To create a To-Do using the Create button:
- Click Create in the upper right-hand corner.
- Select To-Do from the dropdown list at the top of the Create window.
- Click the profile icon to assign the item to one or more team members.
- Input details: name, due date, description, and team.
- Toggle on/off for Private To-Dos.
- Choose repeating cadence:
- Don't repeat
- Daily
- Weekly
- Monthly
- Quarterly
- Annual
- Click Create To-Do.
Creating To-Dos Using the My 90 Workspace

Use My 90 workspaceto view your complete Ninety To-Do list. The Team To-Dos card/widget displays all To-Dos assigned to you from any team in Ninety.
To create a To-Do from the My 90 Team To-Dos widget:
- Click My 90 from the left navigation.
- Click + Create To-Do at the bottom of the Team To-Dos card/widget.
- Input details: name, due date, description, and team.
- Choose a repeating cadence.
- Click Create To-Do.
Creating To-Dos Using the To-Dos Tool in Ninety
The To-Dos toolincludes pages for team To-Dos and private To-Dos. Use the Team dropdown to select which team's To-Dos list to view.

To create a To-Do from the To-Dos tool:
- Click To-Dos from the left navigation.
- Select a team from the Team dropdown.
- Click + Add To-Do on the bottom left of your team's To-Dos list.
- Press the enter key or click the checkmark after titling the To-Do
Click any To-Do to open its details panel to add or revise additional information.
Creating Linked To-Dos from Other Items
Linked To-Dos show the item(s) they're linked to in the Linked Items section of their details card.
You can create a linked To-Do from an existing item in Ninety (such as a Rock, To-Do, Issue, or Headline). Click through the tabs below to learn how.
Rock
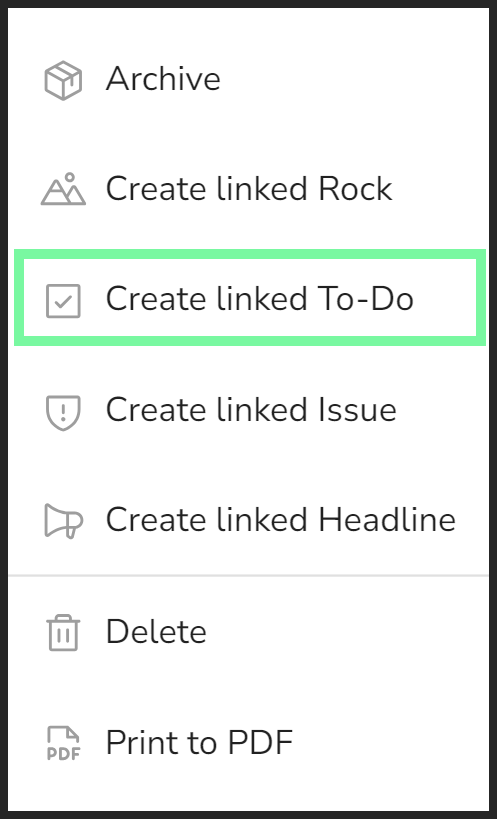
To create a To-Do linked to an existing Rock from the Rocks tool or during a meeting:
- Right-click the Rock (or click the ellipsis at the far end of its row).
- Click Create Linked To-Do from the dropdown.
- Edit details as desired from the popup.
- The assigned due date will be seven days out.
- The title and description start the same as the Rock's.
- Click the Create Linked To-Do button.
To-Do
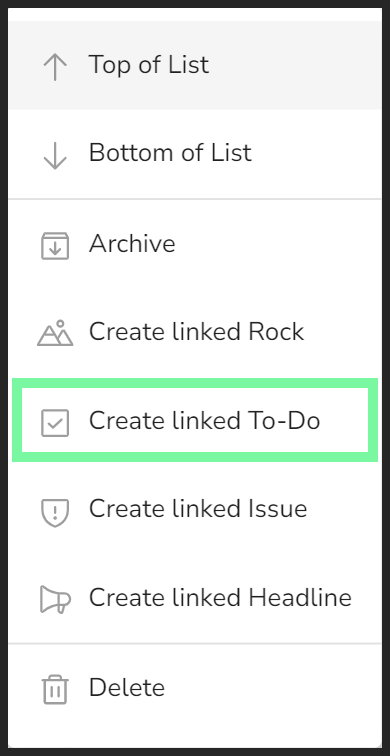
To create a To-Do linked to an existing To-Do from the To-Dos tool or during a meeting:
- Right-click the To-Do (or click the ellipsis at the far end of its row).
- Click Create Linked To-Do from the dropdown.
- Edit details as desired from the popup.
- The assigned due date will be seven days out.
- The title and description start the same as the original To-Do's
- Click the Create Linked To-Do button.
Issue
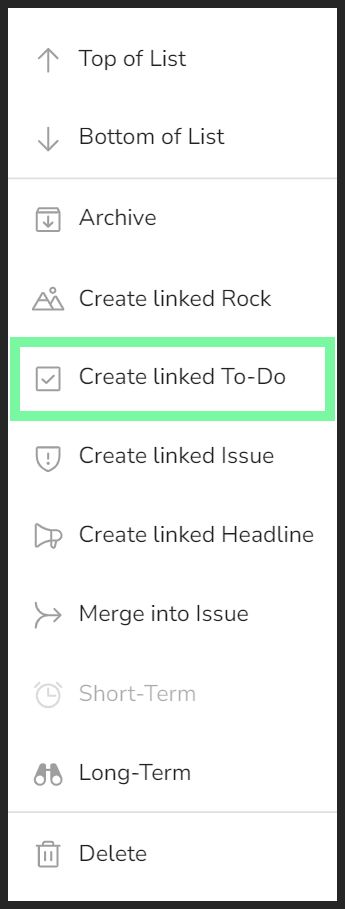
To create a To-Do linked to an existing Issue from the Issues tool or during a meeting:
- Right-click the Issue (or click the ellipsis at the far end of its row).
- Click Create Linked To-Do from the dropdown.
- Edit details as desired from the popup.
- The assigned due date will be seven days out.
- The title and description start the same as the Issue's.
- Click the Create Linked To-Do button.
Headline
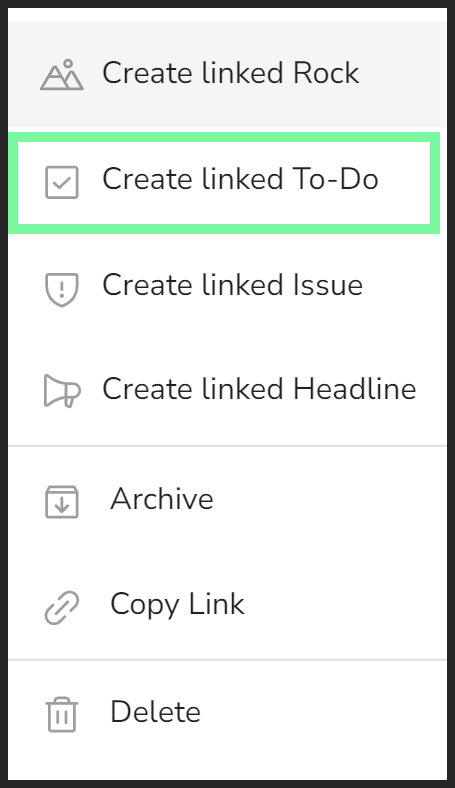
To create a To-Do linked to an existing Headline or Cascading Message from the Headlines tool or during a meeting:
- Right-click the Headline or Cascading Message (or click the ellipsis at the far end of its row).
- Click Create Linked To-Do from the dropdown.
- Edit details as desired from the popup.
- The assigned due date will be seven days out.
- The title and description start the same as the Headline/Cascading Message.
- Click the Create Linked To-Do button.
To unlink an item from a To-Do, the user assigned the To-Do should:
- Click My 90 or To-Dos from the left navigation.
- Click the To-Do to open its details card.
- Scroll down to the Linked Items section.
- Click Edit.
- Click Unlink.
How to Create a To-Do for Multiple People at Once

While creating a To-Do, you can assign as many people as you need by selecting multiple users from the assignee dropdown. Here's how:
- Open a create To-Do window. Either click the create button on the top right of any page in Ninety and then select To-Do from the Create dropdown, or create a linked To-Do from an existing item.
- Select a team or make the To-Do Private. Click the team dropdown and select the intended team. The users available are based on the team selected. To add users from multiple teams, you'll need to make the To-Do Private by clicking the Private To-Do toggle on.
- Assign users. Click the profile icon on the top left of the Create window. Then, click the users you want to assign the item to. You may need to unassign yourself.
- Send the To-Do. Click the Create To-Do button at the bottom of the window to assign the To-Do to the selected users.
Helpful reminders:
- If you want to send a To-Do to multiple people across several teams, you'll need to make it a Private To-Do. This is because each team has its own To-Dos list, so if you want to involve users from different teams, you'll need to make it a Private To-Do instead of a Team To-Do. Review the types of To-Dos above to learn more.
- Each user receives their own copy of the To-Do. Whether you created a Team or Private To-Do, each user assigned receives their own copy. So if one user changes the due date, description, or anything else about their To-Do, it won't affect anyone else.